Photobucket Photobucket Photobucket Photobucket Photobucket Photobucket

Tuesday, April 22, 2014

Happy Earth Day! Recycled Seedling Containers

Hello!

Happy Earth Day!

Sorry I was MIA last week; I'd been feeling under the weather for a while and finally couldn't muddle through my days so I went to the doctor and ended up with pneumonia. Blah. And a sinus infection. Double Blah. And then I had an allergic reaction to my RX. Triple Blah.  But I'm starting to feel better, little by little, and couldn't miss celebrating Earth Day with you guys!


Our little family of 3 loves planting our yearly garden.  I love fresh produce and go to the grocery store at least twice a week to restock our fruit and veggies, which can be a pain and costly!  So, when spring starts to appear, we start talking veggies!

Since we live in So. Cal, our "winters" aren't very harsh... they're more non-existent... so we don't often have to sow our seeds indoors but this "winter" has been so fickle that I thought it would be best to start our seeds in a controlled environment.  So, in true Mommy-kills-fun fashion, I turned a normal, fun seed planting into a learning, science experiment and incorporated the Scientific Method, writing, drawing, and decomp lesson. Yes, poor Lil A can't just dig in dirt and plant some seeds.

Here's how you can drain smart up the fun for your kids too!


Grab your supplies.  We wanted to see which container would help the seeds grow the best, so we used toilet paper rolls, clean eggshells and a Burpee Green House Kit (found at Target for $7.99) for our containers.


Once you have clean, dry eggshells, you'll need to poke holes in the bottom of the shells for water to drain.  I used a small stick pin and poked 3-4 holes in the bottom of each shell.


Fill each shell half-way with garden soil.  Add your seeds to each shell - per packet instructions - cover your seeds with more soil, water and set in a dry, warm area of your house where they get natural sunlight - a windowsill is a great area!


Once you have your toilet paper roll containers all ready, you'll repeat the same planting steps that we did for the eggshell containers.


 Remember to always follow the directions on your seeds packet!  Many veggies have specific needs when it comes to seed depth, sunlight and water requirements.


Set your toilet paper roll planters in a warm, dry area with natural sunlight - we put ours right next to our eggshell planters to keep our variables limited.

Next I had Lil A grab a piece of paper, draw pictures of our containers, ask his question (which planter will help the seeds grow the best?), give his hypothesis (the Burpee Green House), and then write his observations over a few weeks.  Yes, I'm telling you, I can suck the fun out of any activity!

We let our seeds sprout and grow for roughly 2 weeks - Lil A and Big A planted them this past weekend in our NEW planter beds AND the best part was that they were able to take our toilet roll and eggshell planters and place them directly into our garden beds, knowing that the rolls and eggshells would decompose in our soil! More on the planter beds later this week! And guess what, Lil A's hypothesis was spot on - the seeds in the Burpee Greenhouse WERE the FIRST to sprout and they grew the tallest!

So go ahead, start your garden!  You don't have to purchase fancy containers for your seeds, you can reuse items you probably have on hand and teach your kids about Reducing. Reusing. Recycling while learning about the plant life cycle and having the rewards of eating the fruit of your labor!

Happy Earth Day!
Andrea


Wednesday, April 9, 2014

Upcycled Chalkboard School Desk

Hello!

Today is long over due!  I finished this project last summer... and was going to post it as soon as I was done with the rest of my plans for the wall behind where the desk sits and then I never did the wall... and then we ended up putting the Lego Storage System on the wall that was supposed to house the desk so my vision was all messed up BUT luckily, I still love this project and think it's a great upcycled idea!


I picked up this desk at our local Thrift shop on their discount day.  It was originally priced at $15 and then everything on the Patio was marked down to $10 and then I received 50% off since it was the discount so I ended up paying $5 for this fun, retro guy!


I knew I wanted to paint the top - it was damaged from use, had names carved (nothing bad, luckily) into it and was just kind of gross.  I grabbed some All-Purpose cleaner, a rag and went to work.  It helped, but I then grabbed my Magic Erased and gave it another good scrub before I was satisfied with it!  I also scrapped off countless balls of gum that were stuck to the chair and under the desk... High schoolers are nasty.


Before I could paint the top of my desk, I had to primer it.  The top of the desk is some sort of laminate and I knew my paint wouldn't stick to that surface so I grabbed my Zinsser Primer and went to work.


Don't be stingy, roll it on thick then let it dry according to the directions on the can.


After the first coat, I could see a lot of variation and imperfections, so I painted on another coat with a very heavy hand.


Once my final coat of primer was dry, I did a light sanding to get rid of any imperfections before painting my chalkboard paint on.


I used my Rustoleum Chalkboard Paint in Sapphire Blue.  I LOVE the color of this blue - it's vibrant and bright, perfect for a child's desk... the only thing I don't love about it is that you need to apply a good amount of coats.


Follow the instructions on the can for the dry time needed between coats.


See what I mean?  Ya, this was a few coats in...  I honestly did somewhere between 7-10 coats - I lost count half-way through.


But once it was done, it looked great!  This photo is a little dark because I added a "Schoolbook" filter, but the blue is really pretty.  And, of course, not only can you write on this sucker, but you're expected to write on it!  Just as long as it's been seasoned with chalk first!

I'm pretty sure Lil A was solving all the problems of the world when I took this photo...

I LOVE this desk - it's so fun and playful and, gasp - kinda retro!  How is it that the style of desks I used in Junior high and High school are now retro?  And remember that metal basket on the bottom where you were supposed to stash your books/supplies?  That could be my favorite part of this entire project!

I hope this inspires you to take a second look as an imperfect item that, with a little effort, could become something really cool!
Have a great day!
Andrea
Tuesday, April 8, 2014

Lego Storage System

Hello!

I hope everyone had a wonderful weekend!  We had a very full, very fun weekend...


Lil A participated in the Bike Classic, which is a super big deal around here!  It's a fun event that embraces the biking community, from the very young to the professionals.  It's a 5 day event, but on Saturday, they have the public races - Lil A has done it every year since he was 3 (on his bike with training wheels) and this was the first year that he was on a longer course, .65 miles, which he tore through, no problem.  Look at that determination!

And since we're talking about my boy, I wanted to share a Lego Storage system that we adopted.  It's fantastic, especially if you're an anal organizer like we tend to be... it was also inexpensive and it can grow with Lil A's collection.


When we did Lil A's big boy room (you can see that here!) we also decided to clean out the playroom and organize Lil A's Lego collection.  It was a hot mess, and Mama was tired of stepping on a minefield of tiny little nails every time I walked into the playroom, so in a burst of determination and purpose, I dragged Big A and Lil A to Ikea, where we found the Ikea Trofast Storage unit.  And the sun shined down on us through the giant Swedish store and all was good.


We purchased the Trofast Wall Unit and the Trofast 3 Frame Floor Unit.  I wasn't sure about the wall unit when we were at the store, but once we got everything home, it was perfect!


We laid down a fun, town printed rug (also from Ikea) and a bean bag chair from Target in front of the building center.  We were fortunate to have the bins already so we only had to purchase the frames, which were on sale with the Ikea Family membership (which is free!), so I think we ended up paying around $40 total for the 2 frames.


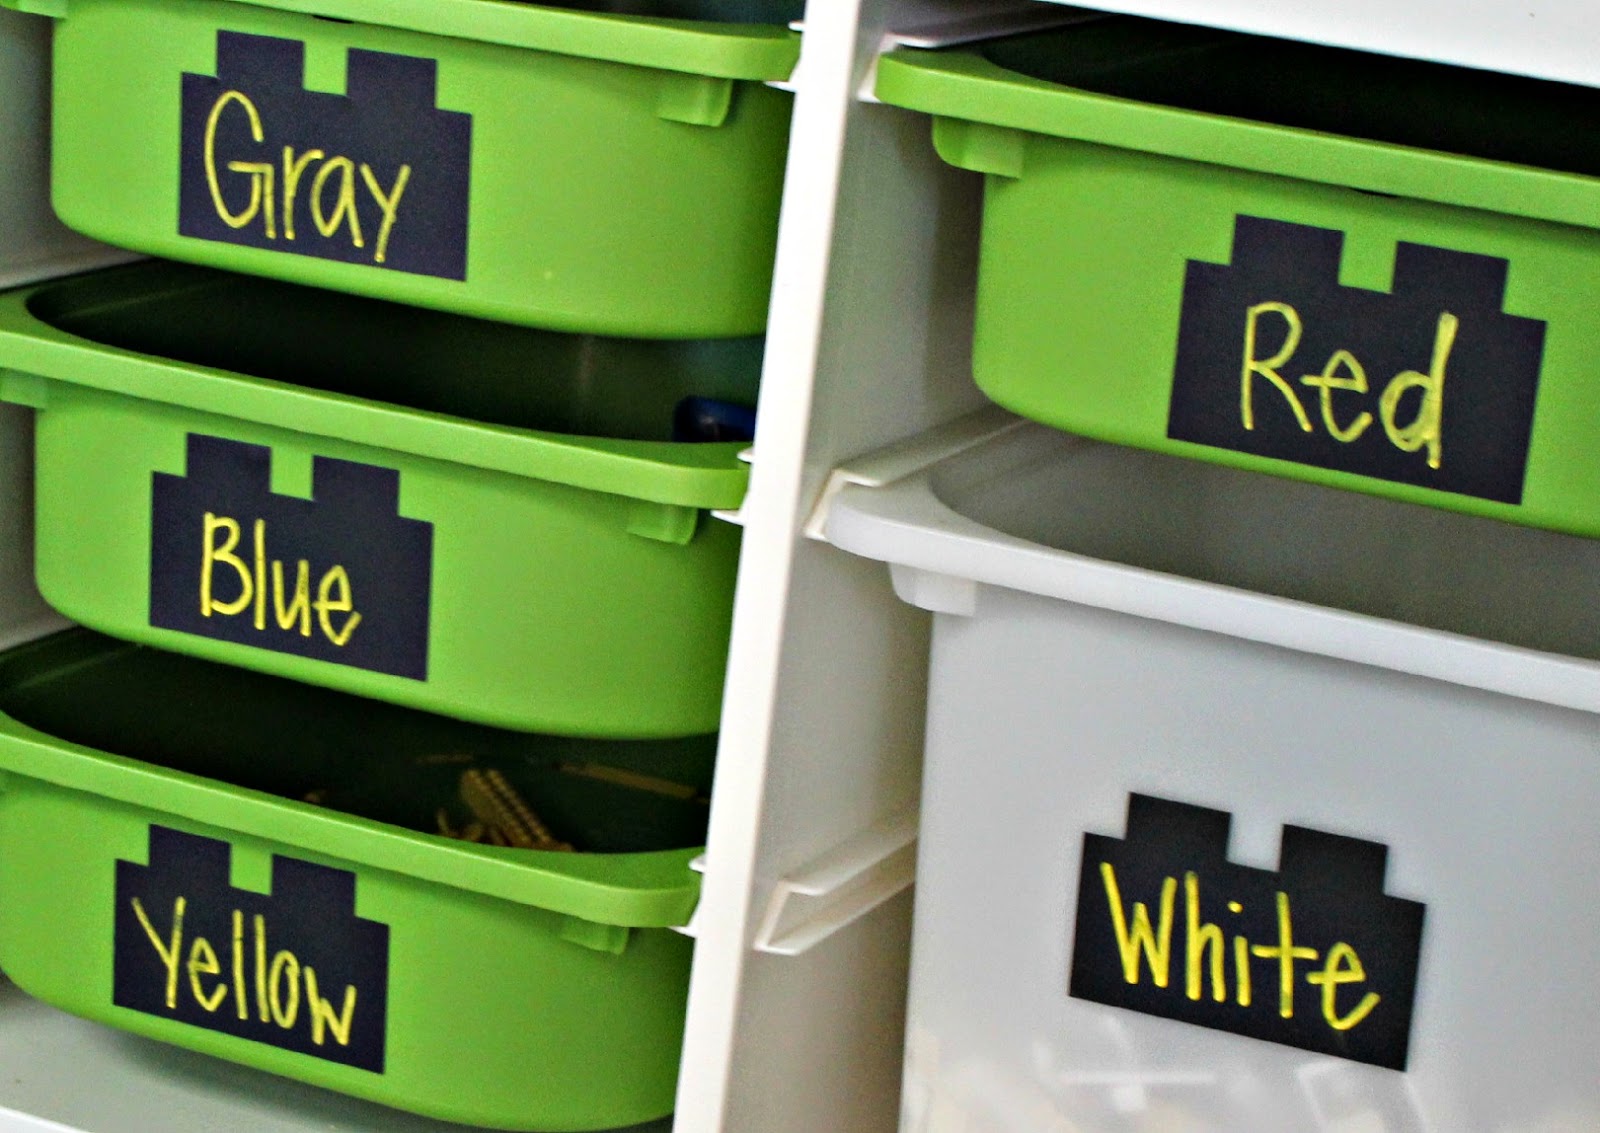
I wanted to keep a simple design, and while I know that Lego is well know for their primary colors, I just couldn't label each bin with the color of Lego's that it held in vinyl, so I opted to create the Lego shape with my Silhouette Cameo and cut each label from Chalkboard Vinyl.


Using a chalkboard marker, I wrote the name of each color in each bin.  So quick and easy!  And uniform.  Now, in all fairness, Silhouette does off a Lego style "brick", but its 3D and I wanted a flat, silhouette shape of the Lego, so I  created my own Lego shape... which maybe I should share a tutorial for?  It's so easy, just a quick group and melding of drawn shapes.

You can check out the line of Ikea Trofast items here.

Happy organizing!
Andrea

Thursday, April 3, 2014

Little Warrior Appliqued Pillow Cover Tutorial

Hello!

It's Tutorial Thursday!  So let's jump right in and get to being a warrior applique-er.  Sure, that's a word. And a thing - warrior applique-er.

Little Warrior Appliqued Pillow Cover

Here's what you'll need:

1/8 yd (6) different colored cotton fabric
1/2 yd flesh colored cotton fabric
1/2 yd solid upholstery fabric
1 yd Pellon 725 double-sided, heavy duty Wonder-Under, iron-on adhesive
Coordinating Thread
Scissors and Rotary Cutter (if you have one)
Sewing Machine
Lifestyle Crafts Feather Headband Dies
Lifestyle Crafts Feather 4x4 Shaped Die
Evolution Die Cutting Machine
Camera
Printer
Your Little Warrior

Let's get started!

1.
Take a close up photo of your little warrior with a plain background behind him.  Print 2 copies.  Cut out your warriors silhouette from one copy - set aside.  Draw a "band" on your warriors head and cut it out - set aside.

2. 
Cut your Pellon adhesive into the following:
(5) 1/8 yd stripes
(1) square that will fit your warriors silhouette 
(1) rectangle that will fit your band

Lay your adhesive sheet with the textured side face down on the back of your fabric (solid fabrics don't really have a back).

Place your iron on the adhesive and press for 5 seconds.  Move to the next area and repeat until your fabric is completely bonded to the adhesive.  Repeat for all your fabrics. 

Leave your paper backing on your fabric, it will help with tracing and die cutting.

3.

Let's cut our your warriors silhouette now.  Lay your silhouette face down on the paper backed adhesive and trace with a pencil or pen.  Carefully cut the silhouette from the fabric backed adhesive and set aside.

4.

Repeat the same steps for the headband that you did for the silhouette.  Set aside.

5.

Cut the adhesive backed fabric that you're using for your feathers into (2) 4"x4" squares and leave the rest the way it is.  

Place you large feather from the headband set and the 4x4 feather die on your magnetic platform, cover with your fabric, place the cutting mat on top and run it through your Evolution.  Repeat for all of your fabrics.

Viola.

6.  

Grab your upholstery fabric that will end up being the front of your pillow, your silhouette, band and feathers.

7.

Lay out your design, trying to center it on your square.  I used a clear ruler to do this, which helped tremendously.  I also cut off the stems of my feathers - they weren't going to be seen on my design and I didn't want them to stick out from under the band.

8.

Peel off the paper backing of your head, band and feathers as you lay them down!  I did this after I had everything placed and I was kicking myself!

9.

Once you get it exactly the way you want it - take a quick photo with your phone - trust me, it'll help in case anything gets moved on accident.

10.

Secure your design to the fabric with a straight pin.  

12.

You can iron on your entire design at the same time or section by section, whichever is easiest for you.  I ironed on my face, went back and pinned my feathers to my fabric and ironed, went back and pinned my band on and ironed but if you prefer, you can do it all at once.

13.

Once everything was on, I felt like my silhouette was a little too stark and I knew exactly what every good Warrior had - war paint!
 

So I cut a small rectangle from the red fabric scrap and ironed that on as well.  I could jave stopped there, made my pillow and called it good but then I wouldn't be me.

14.

You can totally skip this step, it's up to you!  I grabbed my appliqued pillow front and sent into my sewing room.  I threaded coordinating threat into my sewing machine and started edging all the different pieces.  This was the most time consuming part of the process and only because I had to re-thread my machine for every color fabric I used!

15.

Here's the final result.  I'm still thinking about adding a button to cover the hanging feather stems but I'm just not sure.  Luckily I have plenty of time to figure it out!

16.

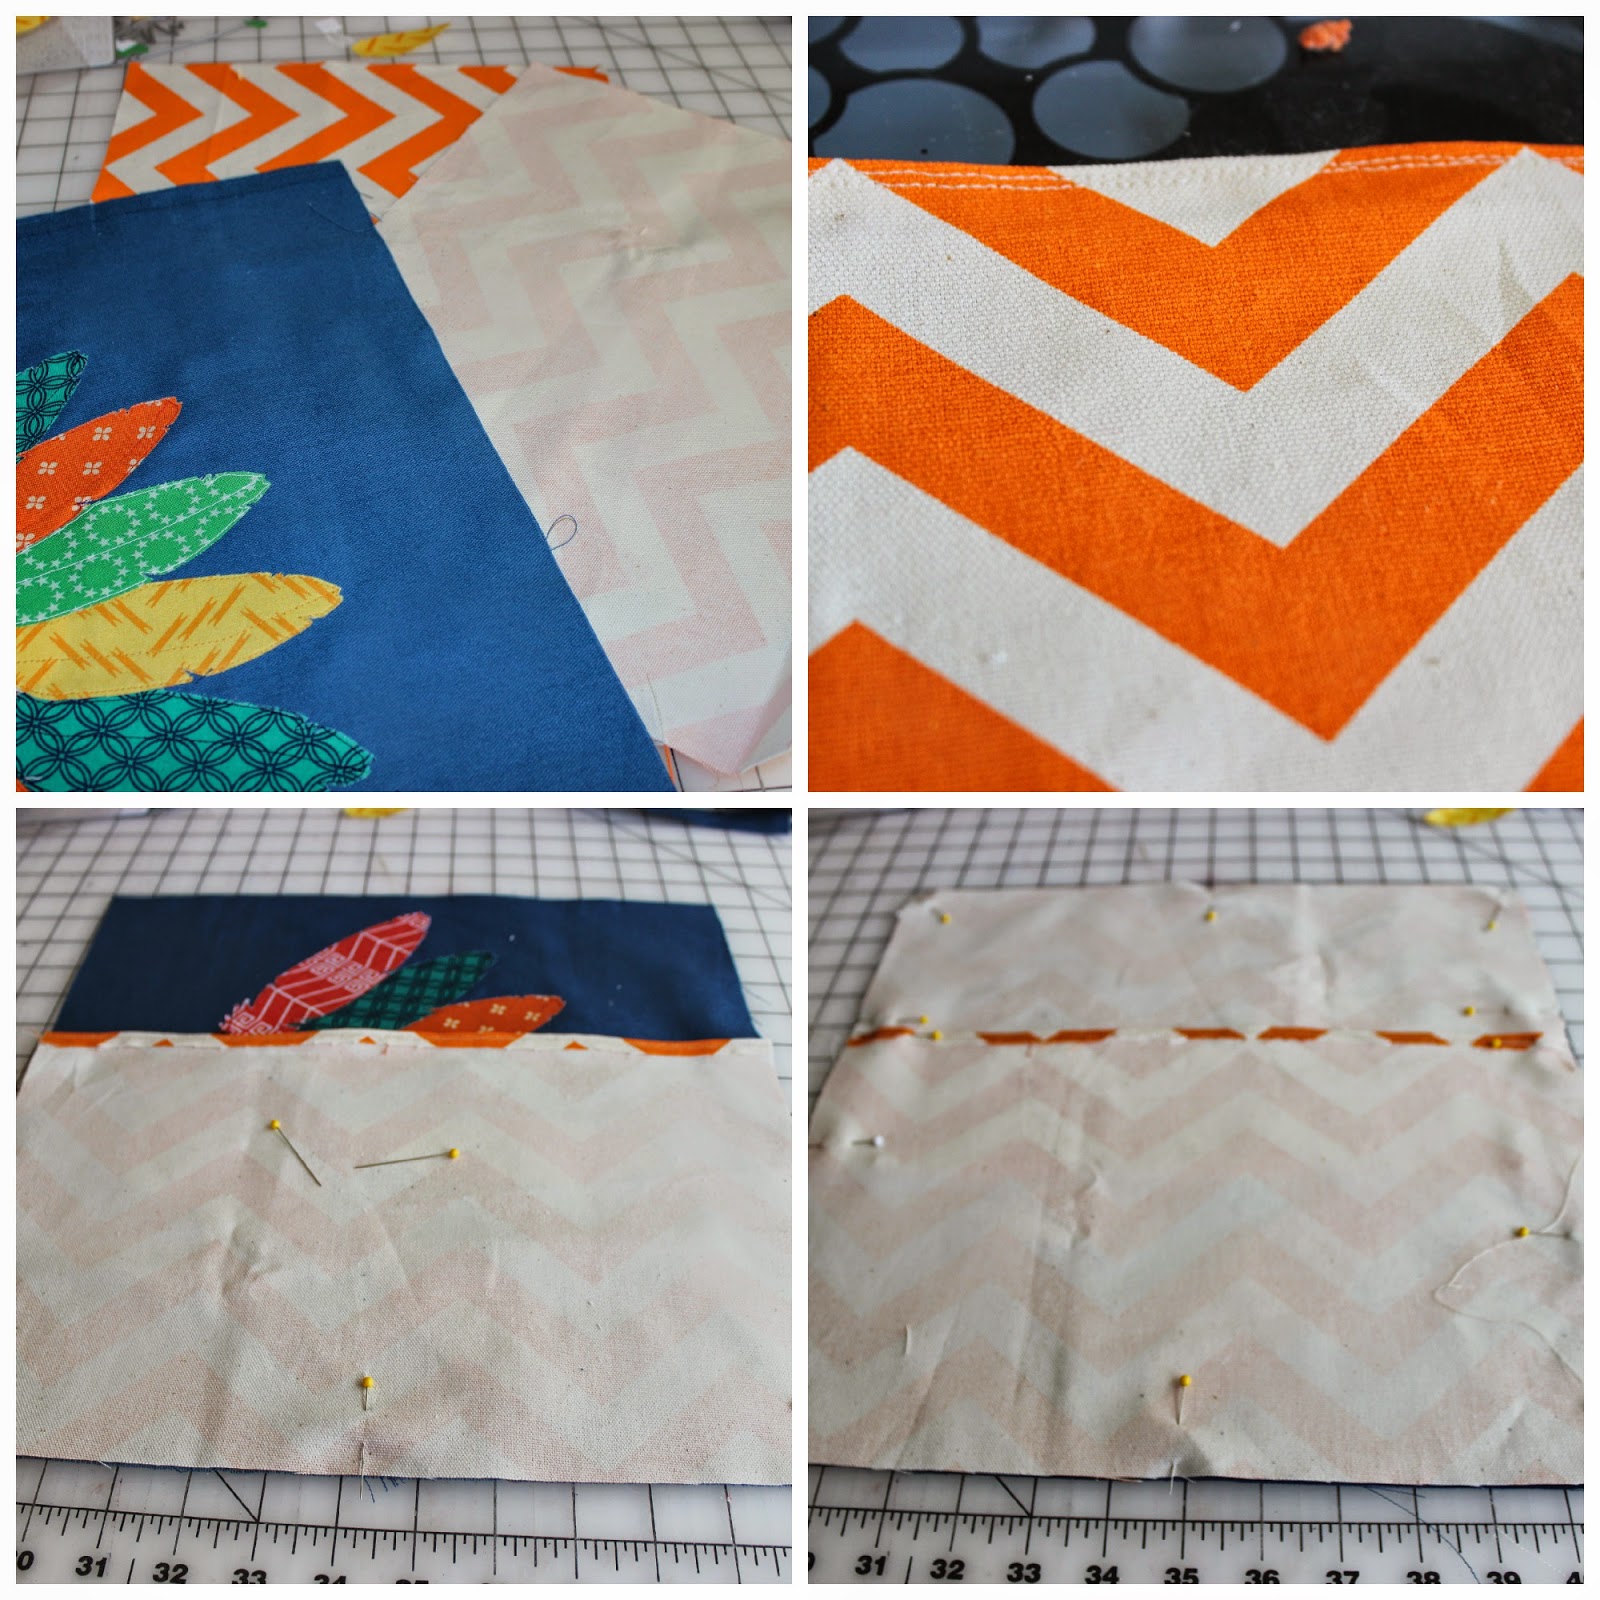
Let's assemble the actual pillow cover now.  This is a super simple, envelope style pillow cover.  

Cut down your appliqued front to 14"x14" - try to keep the appliqued warrior centered.

Cut your (2) back panels to be 9.5"x14".

Fold over the seams that will be where your envelope opening is.  The fold will become your hem.  You can do a double or single fold - depending on what you like.  I prefer to double fold one and single fold the other.  

Sew your hems on your panels.

Pin your double folded hemmed piece onto your front.  Line up the bottom and side as best you can.

Pin your single folded hemmed piece to your front.  Line up the bottom and sides as best you can.

Sew all the way around your cover.  I prefer to do a straight stitch first, going over the corners and where the openings are twice.  I then run my cover through my serger - all the way around!

Turn right side out, poke out corners with a chop stick or something sharp but not too sharp and iron.

Stuff with a pillow form and admire your Little Warrior.  I prefer my pillows to be extra stuffed, so I typically stuff my covers with a size larger form.  I used a 16" pillow form for my 14" cover.


I hope this was helpful!  I really enjoy appliqueing - it intimidated me when I was first learning about it, but after trying it a few times, I realized that it's just normal sewing but with a design!

Please let me know if you have any questions on this!  Or if you give it a shot and how it turns out for you!
Have a great day!
Andrea

ps - don't forget to enter the give-away for some fun WeR Washi Tape on yesterday's blog!  Good Luck!

Wednesday, April 2, 2014

Little Warrior Appliqued Pillow - Lifestyle Crafts Studio Team Project

Hello!

Today's a very fun day for me - I finished my April Studio Team Project last week and was so excited with the way it turned out, (you know, sometimes my ideas are awesome in my head but pale in reality) I couldn't wait to share it with everyone!  And today's the day!


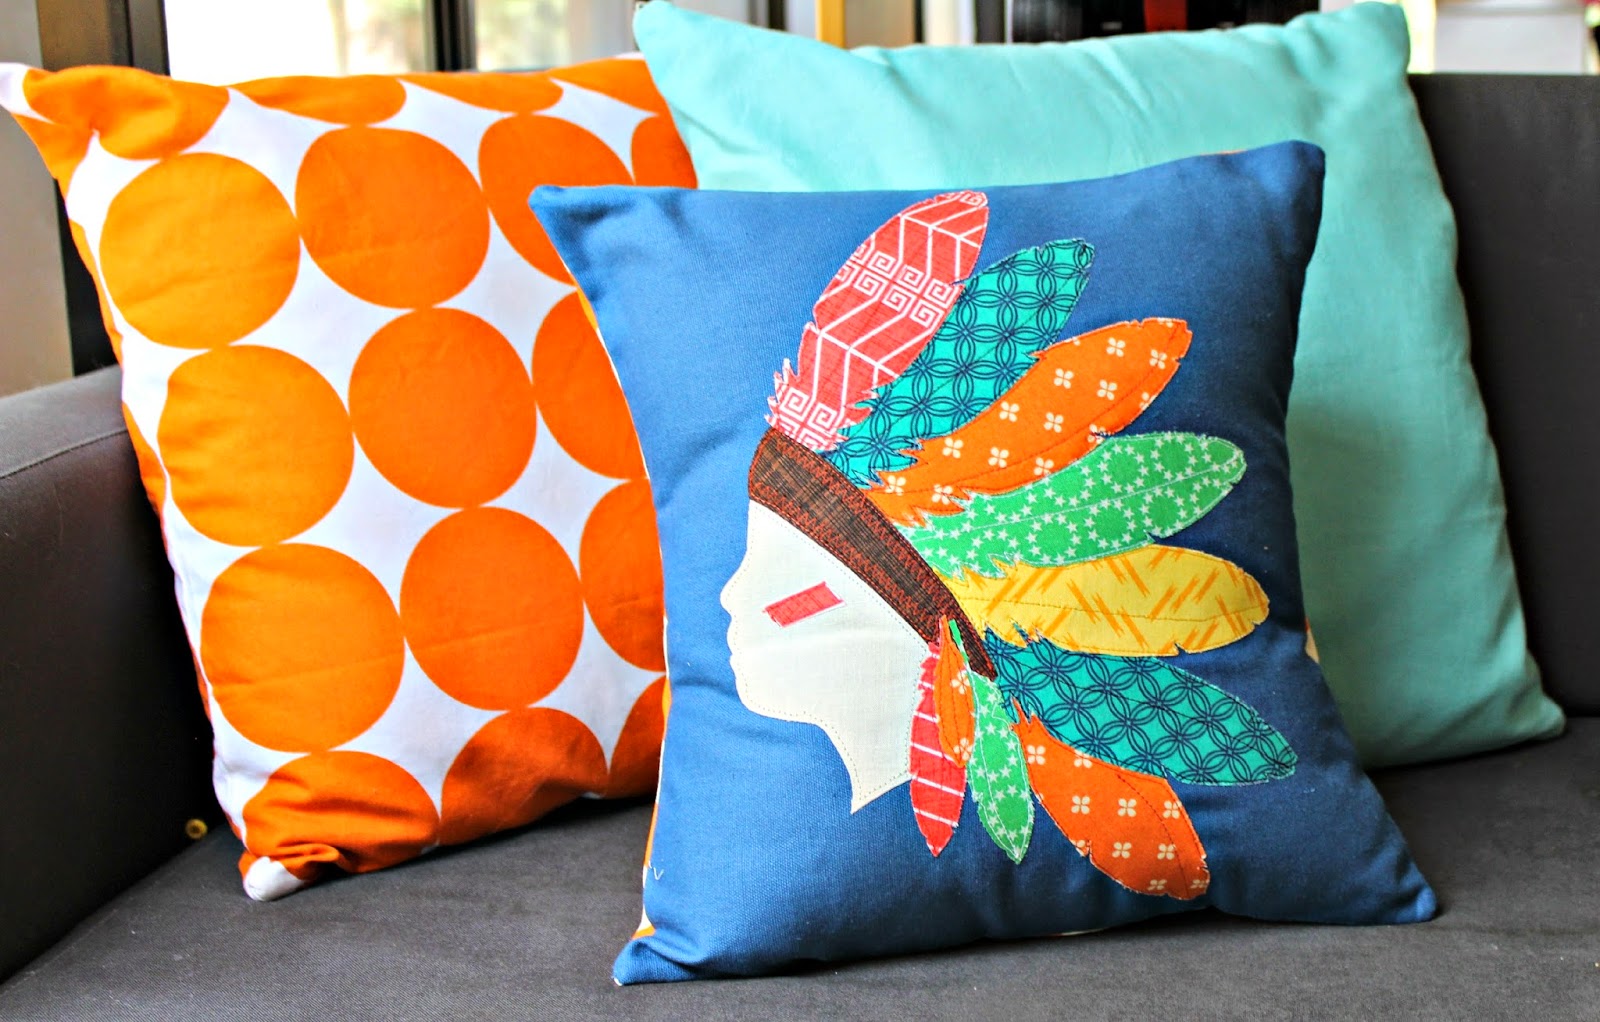
I'm in lurve with this pillow!  Yep, seriously, in lurve!  Why?  Well, because my Little Warrior Appliqued pillow is all about my favorite little guy... Lil A, who is a true warrior.

You may know a little of our story - but if you don't, here's a quick run down...

Lil A was born 2 months premature with a barrage of health issues... so many, to be honest, that I don't remember or understand all of them.  A lot of them cleared up on their own, or with medical intervention, and some we're still dealing with or are aware of today... but he was so strong, he was such a good little guy, a happy little guy, who was constantly being poked, pricked, rolled, scanned, suctioned, alarmed, probed and prodded, tested... he fought for the first 2 years to just breath, he is my fighter, my WARRIOR!

It makes me smile and cry when I look at the above photo and compare it to this one...

We are blessed.

I knew I wanted to make an appliqued pillow cover for his month's project and I was playing with the idea of making a spring motif appliqued pillow cover - possibly with flowers or a bunny... maybe flowers and a bunny(!) but I was listening to Lil A one day, he was telling me a story - a very animated story - and I was awed by how fortunate we are, how strong he is today, how I couldn't see an end to the health issues when he was first born and how grateful I am that he is such a fighter.  A warrior.  And I looked over at him, imagined him with a Native American Headdress and that was that.  The Little Warrior Pillow Cover.


I'll share a detailed tutorial tomorrow, but here's a quick run down.  I took a photo of Lil A's silhouette, which I then printed, cut out and used it as my pattern for my little warrior's face. I wanted this to be totally personal, something that we could cherish and remember him exactly the way he is now.  Using his silhouette was the best way to accomplish this.


I then die cut all of my feathers from adhesive backed fabric.  I used 2 different feather dies for this project: the Feather Headband and the 4x4 Shaped Die - Feathers.


Once I had all of my pieces cut, I ironed them onto a piece of solid blue, upholstry weight fabric that would become the front of my envelope style pillow.


Once the silhouette, feathers and headband were all ironed on, I edge stitched everything.  You don't have to do this, but I liked the extra umph the stitching gave it.


There are so many variations that you can make of this same pillow!  You can use one color fabric for the feathers instead of a variety, you can use solid cotton fabric instead of printed, you can research a certain tribe and duplicate their traditional headdress... it's completely customizable!  Since Lil A's Warrior Pillow was going into the playroom, I wanted it to have a playful vibe hence- a rainbow of colors.


I hope you enjoyed this months project!  This was an easy project, but a little time consuming.  I wasn't able to completely cut through my fabric with the feather dies so I had to hand cut certain areas - I did it while watching a Wild Kratts show with Lil A which made it good busy work while learning about a big nosed monkey.

If you want to make a Little Warrior Pillow Cover for your own Warrior, check back tomorrow - I'll have a detailed tutorial ready and waiting!

And remember, if you want to purchase your own dies, visit the ShopWeR store and enter code KUTZPAPER at checkout to recieve 20% off your entire order!


Now please take a moment and enter the WeR Washi Tape Giveaway!  Good luck!
Andrea

a Rafflecopter giveaway